How do you run groovy files with gradle?
Running groovy files in gradle is very easy. Here is a complete example.
For this tutorial you will need the following:
* Gradle 3.4.1
* Groovy 2.4.7
* Java 8 or higher
First we will need to create the groovy file that we will execute. In our example, let's call it MyMainClass.groovy. In this file we're just printing a basic hello world example.
Then we will need a build.gradle file. In this file, we will have to define our dependencies. Next, we have defined a task called execute.
This task will call main.groovy.MyMainClass when run.
To run the script, we can do this in the terminal:
That's it! You should be able to see hello world on the terminal!
Setup
1. Open wireshark
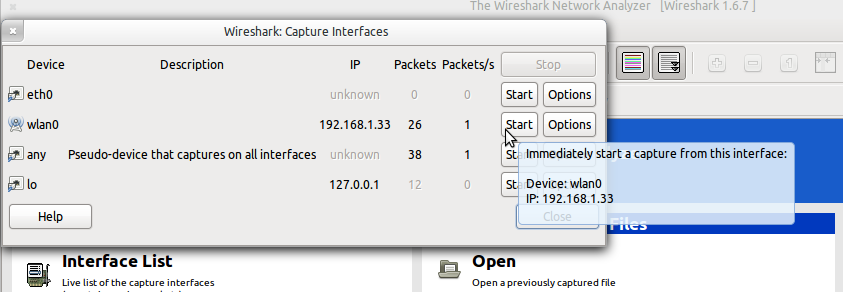
2. Click on the top left icon ("List the available capture interfaces...")
3. Choose 'wlan0' and click on 'Start'.
4. Click on 'Statistics > Conversation List > TCP (IPV4 & IPV6)'
5. A new window with a list of conversations should appear.
6. Send a request using your client. Take note of the ip address and port number of the host that you're sending your request to, so that it's easier to spot on the list.
7. Go back to the TCP conversations window. The new request should appear at the bottom of the list. Click on the said request, then click 'Follow Stream'.
8. Another window should appear bearing the full request that was sent along with the headers and the response.
That wasn't too hard now, was it?
Installing Jenkins
To install Jenkins, first we will need to download this key and add it to our system using this command:
Next, we will need to add this entry to our sources.list using this command:
Next, update the local package index and install Jenkins
Setting up Jenkins
After installation, we can start jenkins by executing the start up script found in our /etc/init.d folder.
However, if you have installed tomcat or other apps using port 8080, you will most likely encounter this error.
So, how do we resolve this? We simply open this file: '/etc/default/jenkins', then, we will have to edit this line:
That line will set the port to 8090, or some other port if you prefer another one. Now that we've overcome that problem, we will need to setup an apache proxy for port 8090. If you haven't got apache installed in your system, go ahead and do so.
Once apache is installed, perform the following commands:
Next, create a file called 'jenkins.conf' under '/etc/apache2/sites-available' and in the file, add this:
After that perform these commands:
If you get an error similar to this:
Don't worry, it is just a friendly warning and not really a problem. If you really wanted to get rid of it though, try these commands:
Now, if everything went well, jenkins should be up and running. You can access it via 'localhost:8090'.
Prerequisites
To use sass in a grails application, we will need to install JRuby. Once JRuby is installed, we will also need to install compass. You can easily install compass via gem:
Setup
Once JRuby and sass are successfully installed, just add the following line in your "BuildConfig.groovy".
Now, to see if the sass was installed correctly, try 'grails run-app' at least once. The plugin should generate a 'GrassConfig.groovy' file. By default this is what it looks like:
Next, download bootstrap (Choose the one under sass). Unzip the file and you should see a vendor folder with an assets folder inside. Inside the assets folder is a bootstrap folder and a 'bootstrap.scss' file. Copy the folder and the file and place it inside your '/src/stylesheets' folder (as specified in 'sass_dir' variable in the GrassConfig.groovy). Here is what it should look like:
Next, move the javascript files from "bootstrap/vendor/assets/javascripts" to your app's "web-app/js" folder.
The fonts should also be moved from "bootstrap/vendor/assets/fonts" to your app's "web-app/fonts" folder. This is how it should look like:
We're almost done! Now on the terminal, simply run:
This command will compile the scss files and generate the necessary css files for bootstrap to be applied on your application. While the command is running, you should see something like this:
At this point, if you try a "grails run-app" command, you will most likely encounter this error:
This error happens when we don't specify the path for the fonts. To resolve this, open the '_variables.scss' and replace this line :
with this:
Hit the "grails compile-css" command.
Then do another "grails run-app" command.
This time the errors should completely disappear and Bootstrap should be completely ready for insertion in your gsp files. In the future, should you decide to create a custom scss file, remember to place it inside the "src/stylesheets" folder. :)